
Exciting Long Weekend in Wynndel!
The Canadian Food Inspection Agency has come up with a new definition of the word “local” that has left many folks scratching their head.
The old definition meant that food had to be produced within 50 kilometers of where it is sold — or at least in the same or a relatively close municipality to be considered “local.”
Under the new definition of “local,” any food produced in BC within 50 kilometers of the provincial or territorial borders qualifies as “local” within the province. This means that blueberries from Jasper are now considered “local” in Vancouver.
The question now becomes — does the BCAFM support this new definition? The BCAFM Project Coordinator Georgia Stanley says the BCAFM “does not yet have a public position on the CFIA’s definition. The board is in the process of discussing this topic and they will share their position with members once a policy has been approved.
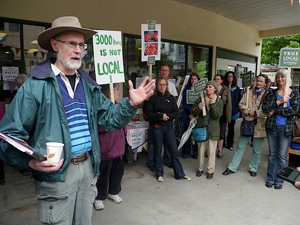
NDP MP Alex Atamanenko at the ‘True Local’ rally outside the Kootenay Co-op in Nelson.
Buy Local Eat Natural is sponsoring the first ever local foods awards for BC! Watch this video, then click over to their site and nominate Creston Valley producers, restaurants, wineries, and stores to their contest.
Categories include:
Let’s put the Creston Valley on the map!


This has been a trial year with the new site and new hours. We are pleased to report that the changes to the Farmers’ Market have been a great success! We have a record breaking number of vendors, in the mid to late 30′s, and those numbers are still growing!


At the market we have a variety of meats, eggs, 3 types of honey, award winning Tabletree juice, a local spin on international spices, a whole assortment of fresh fruits and veggies, locally sourced breads and gluten free options, bedding plants, flowers, both culinary and decorative lavender, an array of artisans ranging from beeswax candles to pottery to jewelry, entertainment, and a fun family and community market place where everything is 100% locally made, baked, or grown!

If you find yourself hungry for lunch while shopping at the market, MacKay’s ice-cream truck is now at the market selling Famous Fritz hot dogs and uberdogs!

As for our new shed: we are very happy with it and would like to thank our lovely sponsors and supporters for making it possible! So thank you to the B Boys, Home Hardware, and David at DeSigns, as well as last years RDCK grant funding! We also want to mention that the sign was paid for by Interior Health and the shed funded in part by The Town of Creston, and Area A, B and C Community Initiatives funding.
In short, we had LOTS of help!

Canada Day is just around the corner and we are ready to celebrate Canada’s 146th birthday with a Canada themed market on June 29th! Look for Canada Day specials and draws for market goodies! So come out wearing red and white to help us celebrate this wonderful country!

Volunteers are needed at the market!
If you or someone you know could volunteer a few hours on a Saturday, it would make a huge difference!
If you are interested, contact Martha 250.254.1594 or email [email protected].
What: Aboriginal Day
When: June 21, 10 am – 2 pm
Where: Lower Kootenay Band
Linda Berg contacted Food Action to see if vendors would like to have a craft or other booth at Aboriginal Day. There is no fee to participate.
For more details, please contact Linda at [email protected] or phone the LKB office.
Hi everyone! My name is Sam Cassel and I am the new summer food action assistant for the Farmers Market.
A little about myself: I was born and raised here in the Creston Valley. I graduated from Prince Charles Secondary School last year and was 1 of 35 students across Canada to be accepted into the Police and Justice Studies Diploma Program at Thompson Rivers University. It is my goal to become a Calgary City Police Officer when I graduate next year.
One of the projects I will be working on this summer is scam-awareness. For more information, come visit me at the market info booth on Saturdays.
Until then, I am looking forward to a summer full of new faces, good food, and fine art!
by Jeanne Kay Guelke
If you’re a gardener, you are probably familiar with lamb’s quarters (aka Chenopodium album L., goosefoot, wild spinach) as a common companion to the hardy spring vegetables you planted yourself. This green herb has small spearhead-shaped leaves, scalloped along the margins, and a powdery white coating under the leaf surface. The BC Ministry of Agriculture has some nice pictures of lamb’s quarters yet also lists it as a noxious weed!
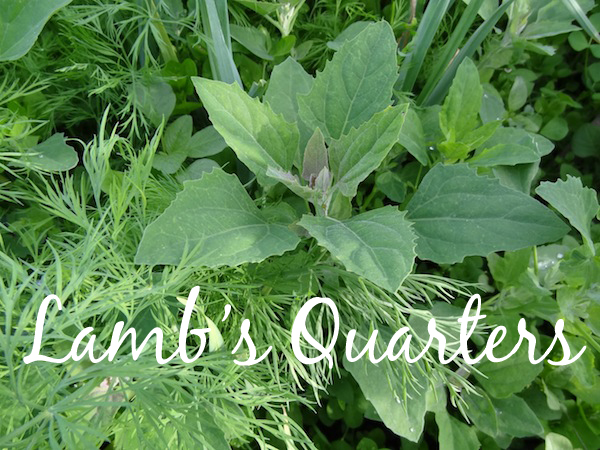
To foragers, home gardeners, and local foodies, however, this is an unjust maligning of a very nutritious salad green and pot herb. Lamb’s quarters come to us loaded with vitamins A and C, and are a good source of calcium and manganese. For a green plant, it has a decent amount of protein .
I’ve eaten lamb’s quarters in different places. Some of them seemed a little rank-tasting when raw, but the crop just harvested from my garden is sweet-tasting enough to go into the salad bowl. My favourite treatment is simply to steam them lightly, like chard or spinach, which removes any rank taste, and heightens the resemblance to spinach. Lamb’s quarters substitute nicely for cooked spinach or chard in any recipe I’ve tried for it.
Lamb’s quarters are best harvested when the plants are young, about as tall as your forefinger. The older ones are edible, but the coarse stalks are best stripped out of the tender leaves. Mature plants lose most of their leaves, in concentrating their energy in the seed-heads. I leave a few to seed and self-sow around the garden, thus ensuring next year’s crop—without having to plant them.
I often find them growing with another edible weed, the redroot pigweed, a member of the Amaranth family. Its leaves look a bit like mint, but have a slightly rank, rather than minty, taste.
If we have a bumper crop, I freeze lamb’s quarters. The process is to wash them, pick through to remove any coarse stems or foreign matter, and then chop coarsely. They will also do well as mixed greens, so it’s fine to chop them up with some young kohlrabi tops, beet leaves, turnip greens, etc. The greens go into a large heavy-bottomed pot with just enough water on the bottom to prevent sticking. (This process is known as “blanching” for some reason. Its purpose is to prevent deterioration of the vegetables during their sojourn in the freezer.) Turn up the heat, and once the bottom layer starts to cook, turn them over a few times so that the mass steams evenly. They are ready just as soon as all of the leaves have turned a bright emerald green: no longer.
Turn the lamb’s quarters into a colander in the sink. Run cold water over them to prevent further cooking, and to cool them down for freezing. Pick up handfuls of the cooled greens over the colander and squeeze the moisture out of them.
Place the greens in freezer bags, which you have labeled and dated. The amount per bag would depend upon a serving size for your household: the greens will expand slightly when reheated. Press the air out of the bags and seal. Into the freezer they go, to be enjoyed during the coming winter.
In searching the Internet for lamb’s quarters, I learned that some hay fever sufferers are allergic to the pollen, and large quantities of lamb’s quarters cause photosensitivity in some people. Putting the lamb’s quarters to good use before they pollinate and enjoying them in moderation would seem like more sensible responses than agribusiness’s answers to delicious edible weeds, which is to spray them with dubious chemicals while encouraging us to eat highly processed and packaged GMOs!
An open letter to our community from Jessica:
Hi everyone,
This is Greenheart Herbal Society ‘s secretary, Jessica, just sending out a reminder about the upcoming “Herb Day” to celebrate the International Herb of the Year, elder! We celebrate at the College of the Rockies on Saturday, June 1st from 10:00am to 3:00pm. The $10 entry fee includes access to the herbal plant sale, tea room, demos, vendors, taste testing and door prizes.
The plant sale, running all day, will feature a wide variety of your favourite fresh potted culinary herbs as well as many others. In the tea room, enjoy a plateful of delicious home-baked goodies and flavourful herbal tea blends, featuring elderberry blends by the local Tigz Designs. Don’t miss the exciting demos, including:
11:30am “Essential Oils for Skin Care in the Sun”
– speaker Yana
Siminiuk. Yana specializes in aromatherapy and carries her own product line of essential oils. In this demonstration, she will be speaking about the importance of caring for our skin and ways to use essential oils before and after sun exposure. She will also be sharing her vast knowledge on essential oils for aromatherapy. Don’t miss her as a vendor as well!
12:30pm “Green Smoothies” – speaker Lynn Reeb. We’ve all heard about these healthy, anti-aging, cleansing “green smoothies”, but the sounds of drinking something that was made from blended green leaves and vegetables can be intimidating. In this demonstration, Lynn will show us just how tasty a drink filled with dark greens can be with just the right ingredients!
1:30pm “The History and Uses of Elder, with Bonus Elderberry Syrup Demo” - speaker Rachel Beck. Rachel is renowned in our community as a clinical herbalist, homeopath and instructor at the College of the Rockies for the Herbal Practitioner program. She has an extensive background in natural medicine and she will be sharing the exciting facts about the history, folklore and uses of this incredible herb. You will also learn how to make a delicious and therapeutic syrup out of the berries of this herb!
2:30pm “The Cultivation and Use of Lavender” - speaker Brenda Lukasiewich. In this demonstration, you will learn about Brenda’s great success with her business of growing, harvesting and production with lavender as well as some interesting facts about this wonderful herb! Brenda has been selling her lavender products in the Creston Valley with an extensive following.
We hope to see you there this weekend!